
I’m a Texas girl in the flesh if not at heart. Born and raised in this barren land I have experienced record breaking heat and have heard my fair share of tornado alarms. Every summer I overhear at least one person tell another that after living here a few years they will get used to the heat. All I can think of is WRONG! I grew up here and I’m still not used to it! That being said I’m also not one to shy away from it. Whether it be extreme heat or icy cold I tend to brave the climate and live life as usual. At least that’s how I was before having two toddlers to wrangle. As I am quickly discovering, getting out and about in freezing weather with two hyperactive boys is a little more than difficult. I have attempted it several times already but, well, let’s just say that after my last attempt, the next time we had a couple of cold days I chose to stay home. Day one was loads of fun. Hot chocolate, pajamas all day, and movies were the perfect combination…at least until we hit day two. As the day wore on it became a little more than obvious that we were all going stir crazy. Adam and Owen were fussy and my fuse was about to light up so what did we do? We put on fun kiddie music and decided to “shaker” off our bad moods! Lol. Sooo cheesy!
Horrible pun aside, I have found that crafts…especially ones that are slightly challenging can be a game changer. If your child is in a bad mood or woke up on the wrong side of the bed a lot of times a craft can be the perfect diversion or “reset button” so to speak. Here is a simple but challenging project that is great for developing fine motor skills.
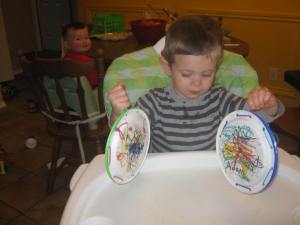
Musical Shakers
Supplies:
String
Pipe Cleaner
Hole Puncher
Paper Plates
Markers
Rice, beans, or something else that will make noise when shaken
To Make:
Simply punch holes at an equal distance from each other around the circumference of a paper plate. Punch holes the same distance on the second paper plate. Then take a pipe cleaner and cut off a piece about the length of your pointer finger. Tie a piece of string to the pipe cleaner that is long enough to be threaded through the paper plates. Also tie a double knot at the end of the string. Finally line up the holes, show your toddler how to “sew” the plates together and depending on where they are at developmentally they can either sew on their own or with your help. Before you finish the last hole insert the rice into the plates and then sew and knot closed. Then decorate as desired!


There you have it! Next time your kids are driving you crazy and your choclate supply has been compromised you have another way to “shaker” it off. 😛


Great idea!!! Seriously I can’t come up with things like this for my boys on my own. Thank you for sharing.
LikeLike
Thanks! I actually can still remember making them when I was a child so technically I didn’t come up with the idea on my own! 🙂
LikeLike
Oh these are really cute! What a good idea. And I have some beans that I can use for it. They definitely look like they are having fun! 🙂
LikeLike
They were! The only problem is that they kept trying to use them to wake up my husband (he works nights)! Lol.
LikeLike
Those look like fun! A great boredom buster – if you don’t mind a little noise! 😉
LikeLike
Where were you when my kids were younger? You are full of so many ideas. If only my tween would be entertained by this.
LikeLike
What a great idea! I love this. 🙂
LikeLike